Planning Your Diecast Car Display Case
Building a diecast car display case is a rewarding project that allows you to showcase your collection while protecting your valuable models. Careful planning is the key to success. Before you even pick up a tool, take the time to consider all aspects of the project, from the size and materials to the lighting and final placement. This initial planning phase ensures that the finished display case not only looks great but also meets your specific needs and effectively highlights your prized diecast cars. Remember, a well-planned display case is an investment that will preserve and enhance your collection for years to come.
Assessing Your Collection
Start by taking inventory of your diecast car collection. How many models do you have? What are their sizes? Do you have a mix of scales, such as 1:18, 1:24, or 1:43? Knowing the quantity and dimensions of your cars is crucial for determining the overall size of the display case and the spacing between shelves. Consider future additions to your collection – it’s always wise to build a case that has a little extra room for growth. Organizing your cars by make, model, scale, or any other preferred method can also influence the layout of your display case, enabling you to create a visually appealing and organized showcase for your collection. Understanding your current and future collection needs will set a foundation for a successful build.
Determining the Size and Dimensions

Once you know the size of your collection, calculate the required dimensions for your display case. Measure the height, width, and depth of your largest diecast car and add a few inches of extra space around each model. This will provide enough room for easy viewing and prevent the cars from appearing cramped. Consider the available space in your home where you plan to place the display case. Measure the area to determine the maximum dimensions you can accommodate. Think about how many shelves you want and the distance between each shelf. Adequate spacing will make it easier to see and appreciate each car. Drawing a simple sketch or using design software can help visualize the final product and ensure the display case fits perfectly in your chosen location. Take this step seriously, because dimensions are the core of your case.
Choosing the Right Materials
The materials you choose will greatly impact the appearance, durability, and cost of your display case. Wood, acrylic, and glass are the most common options, each offering unique benefits. Consider your budget, skill level, and desired aesthetic when making your selection. The choice of material will also influence the tools and techniques required for construction. Research different materials and their properties before making a final decision. Consider factors such as ease of assembly, maintenance, and how well each material complements your collection. A well-chosen material will not only protect your models but also enhance their visual appeal, contributing to a stunning display.
Wood vs. Acrylic vs. Glass
Wood offers a classic and sturdy look, and it is relatively easy to work with. Solid wood or plywood can be used, depending on your budget and desired aesthetic. Acrylic provides excellent clarity and is lightweight, making it a good choice for display cases that require a modern look. It is also less likely to shatter than glass. Glass offers a premium appearance and allows for unobstructed views of your collection, but it is heavier and more fragile than acrylic. Each material has its pros and cons. Wood can be painted or stained to match your decor, acrylic is resistant to UV light, and glass provides a sleek finish. Carefully weigh the advantages and disadvantages of each material to select the best fit for your display case.
Essential Tools for the Build

Having the right tools is essential for a successful DIY project. Gather all necessary tools before you begin cutting and assembling your display case. This will save you time and ensure accurate measurements and cuts. The specific tools needed will depend on the materials you choose. Safety gear, such as safety glasses, gloves, and a dust mask, is also crucial to protect yourself. Always prioritize safety and follow the manufacturer’s instructions when using power tools. A well-equipped workspace and the correct tools will make the building process much more enjoyable and the final product will reflect the time and effort put in.
Gathering Your Tools
For a wood display case, you’ll likely need a saw (circular, table, or hand saw), a drill, a measuring tape, a level, a screwdriver, clamps, and sandpaper. For acrylic or glass, you may need a specialized cutter or scoring tool. Regardless of the material, a measuring tape, a pencil, and a square are essential for accurate measurements. Consider a power drill for faster assembly and a sander for smoothing edges. Don’t forget wood glue, screws, nails, or other fasteners. Always prioritize safety and ensure you have the correct tools and equipment for the materials you have chosen. Having the proper tools makes the process much easier, resulting in a well-built, durable, and attractive display case for your diecast cars.
Cutting and Preparing the Materials
Once you have all your materials and tools, it’s time to start the construction process. Precise measurements and careful cutting are essential for ensuring that all the pieces fit together correctly. Double-check all measurements before making any cuts, and always follow safety precautions when operating power tools. Taking your time during this stage will save you from making mistakes and potentially wasting materials. A well-executed cutting process ensures the structural integrity of the display case and contributes to a professional-looking finish. Accurate cuts will make the assembly phase much smoother, and the end result will be a display case that proudly showcases your collection.
Cutting the Wood or Acrylic

Using your measurements from the planning phase, carefully cut the wood or acrylic pieces to the required size. If using wood, a circular saw or table saw is ideal for straight cuts. For acrylic, a scoring tool or specialized cutter is recommended. Ensure you have a stable and well-lit workspace to make accurate cuts. Use clamps to secure the materials while cutting, preventing them from moving during the process. If you are not experienced with power tools, consider asking a professional to cut the pieces for you, especially if you are working with expensive materials. Precise and clean cuts are fundamental to the final appearance of your display case, so pay close attention to detail throughout this stage.
Assembling the Frame
With the pieces cut to size, begin assembling the frame of your display case. This usually involves joining the sides, top, and bottom using screws, nails, or wood glue, depending on your chosen construction method and materials. Ensure that the corners are square and the frame is level. Clamps are extremely useful for holding the pieces together while the glue dries or while you are driving in screws. Take your time during the assembly process, ensuring that all joints are secure and the frame is structurally sound. If you notice any gaps or misalignments, make adjustments before proceeding. A solid and well-built frame is the foundation of your display case, so make sure it is built correctly to avoid issues later on.
Securing the Sides and Back
Once the frame is assembled, attach the sides and back of the display case. This can be done by screwing or gluing panels of wood, acrylic, or glass to the frame. If you’re using glass, exercise extra caution and use appropriate fasteners designed for this purpose. Make sure the panels are flush with the frame and that the back panel is securely attached to maintain the structural integrity. The sides and back panels will protect your diecast cars from dust and debris. Proper sealing of the panels can help maintain a stable environment inside the display case, preserving the quality of your collection. Ensuring that these panels are installed correctly will provide both protection and enhance the overall visual appeal of your finished display case.
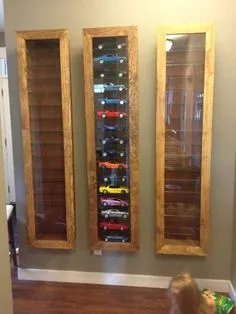
Adding Shelves and Supports

Adding shelves allows you to organize your diecast cars effectively. Carefully plan the shelf layout to accommodate your collection, ensuring that the spacing between shelves is adequate for the size of your models. Consider using adjustable shelf supports to customize the shelf heights. Installing shelves can be done with shelf pins, brackets, or by building fixed supports. Make sure the shelves are level and securely attached to the frame to prevent them from sagging under the weight of the cars. Proper shelf installation is critical for both functionality and visual appeal. A well-designed shelf layout will enhance your display, allowing you to easily view and enjoy your entire collection.
Designing Shelf Layout
Before installing the shelves, design a layout that maximizes the display space and allows for easy viewing of your cars. Consider the different scales and sizes of your diecast models. Determine the spacing between the shelves to accommodate the tallest cars in your collection. You might also decide to arrange shelves in a staggered pattern for a more dynamic display. Sketching out the layout beforehand can help visualize the final product and ensure that your collection is displayed in the most attractive and organized way. Remember to factor in future additions to your collection when planning the shelf layout. This will ensure that the display case remains functional and visually appealing as your collection grows.
Installing Shelves
Once the shelf layout is finalized, it’s time to install the shelves. Use shelf pins or brackets to provide support. Make sure the shelves are level and securely in place. Consider using wood glue or screws for added stability, particularly if the shelves will hold heavier models. If you are using adjustable shelves, make sure the shelf supports are properly aligned and can hold the weight of your cars. Test the shelves to ensure that they can safely support your collection. Proper installation of the shelves ensures the structural integrity of the display case and prevents potential accidents. Take your time and ensure that each shelf is securely attached and level. Well-installed shelves are fundamental for showcasing and protecting your cherished diecast models.
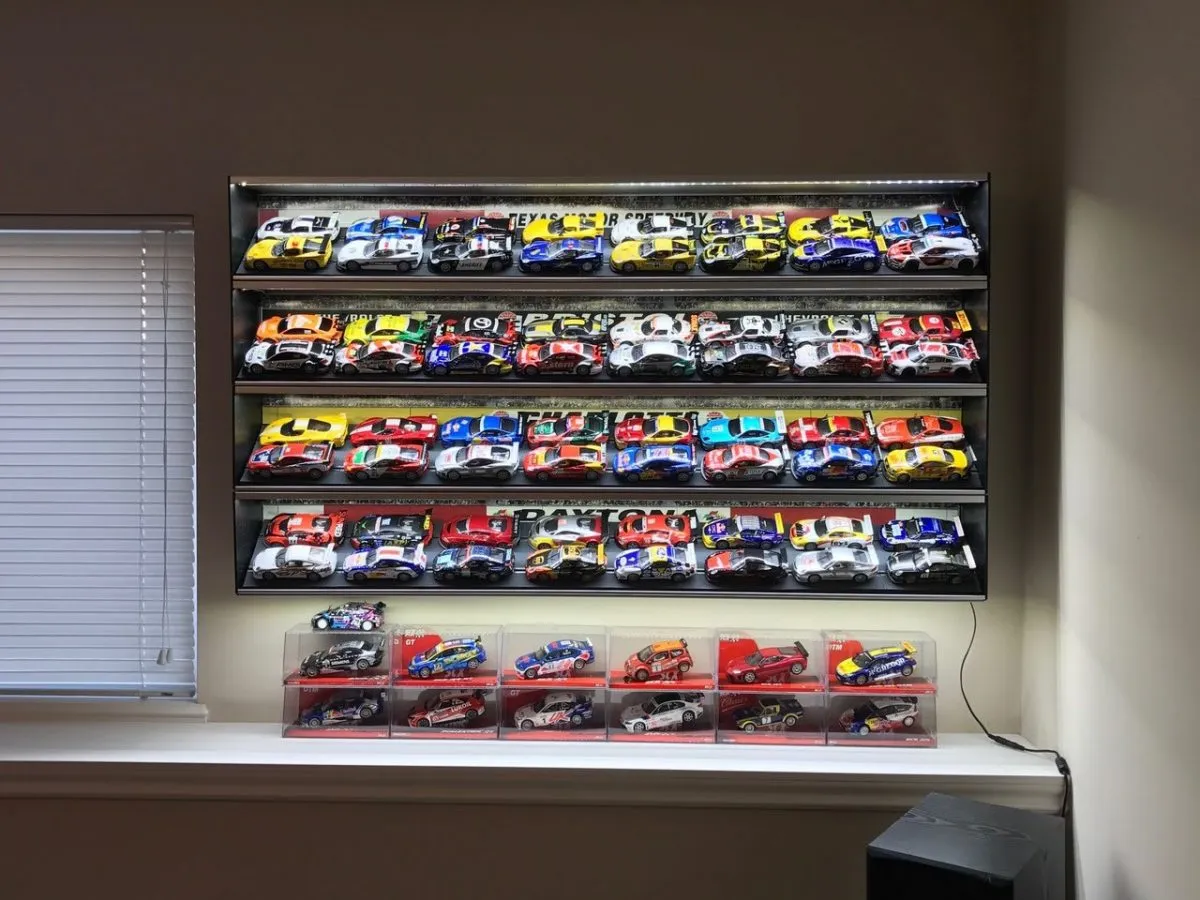
Lighting Options for Your Display Case

Adding lighting to your display case can significantly enhance the visual appeal of your collection. Proper lighting highlights the details of the diecast cars, creating a more captivating display. Consider the type of lighting that best suits your needs and budget. LED strip lights are a popular choice due to their energy efficiency, low heat output, and ease of installation. The placement of the lights can also dramatically change the look of your display. Experiment with different lighting positions to find the optimal way to illuminate your diecast cars. When choosing your lighting, consider the color temperature to create the right ambiance and enhance the details of your models. The right lighting transforms the display case from a storage unit to a showcase.
Types of Lighting
LED strip lights are a popular and effective choice for display cases, as they provide bright and even illumination. They are available in various colors and brightness levels, and they are relatively inexpensive and easy to install. Other options include recessed lights or spotlights. Spotlights can be used to highlight individual models or create dramatic effects. The choice of lighting depends on the style and design of the display case. Consider the overall aesthetic of your display case when choosing lighting. Proper illumination enhances the details of your diecast cars, creating a more visually appealing and captivating presentation. Look for options that fit your budget and align with your vision for the finished product.
Integrating LED Strips
Integrating LED strip lights is a straightforward process. Measure the lengths of the shelves and cut the LED strips to fit. Most LED strips have adhesive backing, making them easy to stick to the inside of the display case. Ensure that the power supply for the LED strips is hidden from view. You can also run the wires discreetly through the frame. Consider using a dimmer switch to control the brightness of the lights. This allows you to adjust the lighting to best suit your mood and to highlight specific aspects of your display. The appropriate placement and integration of LED strip lights adds depth and visual interest, transforming your display case into a professional-looking showcase for your collection.
Adding the Finishing Touches
With the core structure and essential components in place, it is time to add the finishing touches to make your display case truly stand out. These details will enhance the overall aesthetics and elevate the presentation of your diecast car collection. From cleaning and polishing to adding decorative elements and carefully positioning the case, these final steps will complete the transformation of your display case, turning it into a visually stunning and well-organized showcase.
Cleaning and Polishing
Before displaying your diecast cars, thoroughly clean and polish the display case. Use a soft cloth and appropriate cleaning solutions to remove any dust, fingerprints, or smudges from the surfaces. For wood, a wood polish can restore the shine and protect the finish. For acrylic or glass, a specialized cleaner can remove streaks and ensure clarity. Cleaning and polishing will greatly improve the appearance of the display case, creating a more attractive and inviting environment for your collection. This attention to detail makes your display case more visually appealing and allows your diecast cars to truly shine. Regularly cleaning your display case is essential to maintaining its appearance and protecting your models.
Mounting or Positioning the Case
Decide where to mount or position your display case. If your display case is designed to be wall-mounted, make sure it is securely attached to the wall using appropriate anchors and screws. Ensure that the wall is strong enough to support the weight of the display case and its contents. If the display case is a freestanding unit, choose a stable and level surface. Consider the overall aesthetic and placement of the display case within your home. Choose a location that allows for optimal viewing and that complements your existing decor. Think about how the light falls on the display case and its impact on the models. The proper mounting or positioning of your display case adds the finishing touch, enhancing its appeal and making it an integral part of your living space.
Displaying Your Diecast Cars
The final step is to arrange your diecast cars within the display case. Consider the best way to showcase your collection. Organize your cars by make, model, scale, or any other preferred method to create a visually appealing display. Use the shelf layout to create a sense of order and visual interest. Experiment with different arrangements until you find the setup that best highlights your collection. Proper display elevates the visual appeal of your diecast cars. Consider incorporating additional decorative elements, such as small signs or miniature dioramas, to enhance the overall presentation. Displaying your diecast cars with care and creativity allows you to share your passion with others and create a stunning showcase for your treasured collection.