What are Custom NASCAR Diecasts?
Custom NASCAR diecasts are personalized scale model cars that replicate real-life NASCAR vehicles or feature original designs created by enthusiasts. Unlike mass-produced diecasts, custom builds allow for unique paint schemes, detailed modifications, and a personal touch that reflects the owner’s passion for the sport. These creations range from simple repaints to intricate builds that incorporate custom parts and advanced detailing techniques. The allure of custom diecasts lies in the ability to own a unique piece of memorabilia, showcase artistic talent, and connect with the NASCAR community in a creative way. Whether you’re a seasoned modeler or a beginner looking to dive into a new hobby, the world of custom NASCAR diecasts offers endless possibilities for creativity and self-expression.
Benefits of Custom Diecasts
Creating custom NASCAR diecasts offers a multitude of benefits, going beyond just owning a unique collectible. First and foremost, it’s a fantastic creative outlet, providing an avenue for artistic expression and the development of fine motor skills. The process of customizing a diecast is therapeutic, allowing you to unwind and focus on a project from start to finish. Moreover, custom diecasts are highly personalized, reflecting your individual tastes, favorite drivers, or memorable race moments. This makes them a valuable addition to any collection and a great conversation starter. Additionally, the skills you gain in customizing can be applied to other modeling projects and hobbies. Finally, the custom diecast community is incredibly supportive, providing resources, inspiration, and a sense of belonging for all enthusiasts.
Materials You’ll Need

To embark on your custom NASCAR diecast journey, you’ll need a range of materials and tools. These can be acquired from hobby stores, online retailers, or specialized diecast customizing suppliers. Essential items include a high-quality diecast model as your base, various grades of sandpaper, paint (acrylic or enamel are popular choices), paint thinner or a specific remover, primer, clear coat, detailing brushes in multiple sizes, decals (either pre-made or custom-printed), and adhesive. Additional tools like a hobby knife, tweezers, a cutting mat, and a heat gun or hair dryer for decal application are also useful. Furthermore, having a well-ventilated workspace and safety equipment, such as a respirator and gloves, is crucial. Investing in these materials upfront will ensure a smooth and enjoyable customizing experience, leading to professional-looking results.
Gathering Your Supplies
Before you begin, gather all your supplies and organize your workspace. This preparation is crucial for a smooth and efficient customizing process. Ensure you have all the necessary paints, thinners, brushes, and tools within easy reach. If you’re using an airbrush, make sure it’s clean and functioning correctly. Lay down a protective surface on your work area to prevent paint spills and damage. Good lighting is also essential, especially when working on intricate details. Having a well-organized workspace reduces the chances of mistakes and allows you to focus on the creative aspects of your project. Regularly clean your brushes and tools as you work to maintain the quality of your final product. Finally, take inventory of what you have and identify any supplies you might need to order before you start, so you’re not interrupted mid-project.
Choosing Your Diecast
Selecting the right diecast model is the first critical step in creating a custom NASCAR diecast. The quality of the base model will significantly impact the final outcome of your project. Opt for models with a good level of detail, crisp lines, and accurate proportions. Popular brands like Lionel Racing and Action Racing Collectables offer a wide range of NASCAR diecasts with varying levels of detail and scale. Consider the condition of the diecast and choose one that is in good shape, with minimal damage. Think about the desired paint scheme and choose a model that will work well with your design, perhaps a car with a simple base color or one that is easy to disassemble. Check for any existing flaws or defects that might require extra work to correct. Ultimately, the ideal diecast is one that inspires you and serves as a solid foundation for your custom creation.
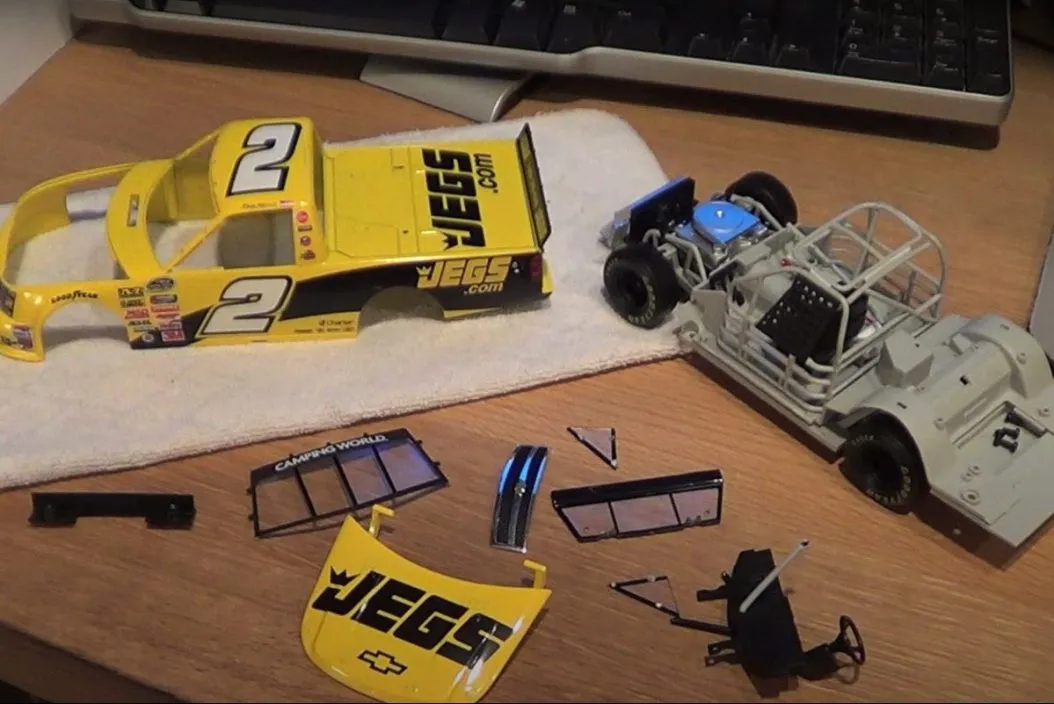
Disassembling Your Diecast

Disassembling your diecast is a crucial step in the customizing process, allowing for thorough paint removal and easier detailing. Start by carefully removing the wheels, using a small screwdriver or hobby knife. Next, remove any decals or plastic parts like spoilers or mirrors. The car’s body is typically held together by screws, which can be found on the underside or inside of the chassis. Use the correct size screwdriver to avoid stripping the screw heads. Once the screws are removed, carefully separate the body from the chassis, taking note of how the parts fit together. Keep all small components in a safe place to prevent loss. Disassembly can be tricky, so work slowly and methodically, referring to online tutorials or guides if needed. This step is essential for achieving a professional-looking finish.
Removing the Original Paint
Removing the original paint is essential for a clean and professional custom finish. There are several methods you can use. Chemical paint strippers can be effective, but they require careful handling and proper ventilation. Follow the manufacturer’s instructions precisely, and wear protective gloves and eyewear. Alternatively, you can use a sanding method, starting with a coarser grit sandpaper to remove the bulk of the paint and gradually working your way to finer grits for a smooth finish. Be careful not to damage the underlying details of the diecast. A combination of both methods might be the most effective approach. After removing the paint, thoroughly clean the diecast body with soap and water and let it dry completely before proceeding.
The Importance of Surface Preparation
Surface preparation is a critical step that affects the final look of your custom diecast. After removing the original paint, sand the surface lightly to ensure it is smooth and free of any imperfections. Use progressively finer grit sandpaper to achieve the best results. Fill any scratches, dents, or imperfections with model filler and sand them smooth once dry. Clean the surface thoroughly with a degreaser to remove any residue and oils. Applying a primer is also essential, as it helps the paint adhere to the metal surface and provides a uniform base color. Choose a primer that is compatible with your chosen paint. Allow the primer to dry completely and lightly sand it before applying the base coat. Careful surface preparation ensures a smooth, even paint finish and enhances the durability of your custom diecast.
Painting Your Custom Diecast

Painting your custom diecast is where your vision begins to take shape. Choose your paint colors and desired finish (gloss, matte, etc.). Acrylic paints are popular due to their ease of use and cleanup. Enamel paints offer durability. An airbrush provides the most professional results, but rattle cans can also be used. Apply thin, even coats of paint, allowing each coat to dry completely before applying the next. This prevents runs and ensures a smooth finish. Multiple thin coats are always better than one thick coat. If using an airbrush, experiment with different air pressure settings to achieve the desired results. If using spray cans, make sure to spray in a well-ventilated area. Be patient and take your time, as a well-executed paint job is crucial for a high-quality custom diecast.
Applying the Base Coat
Applying the base coat is a pivotal step in painting your custom NASCAR diecast. The base coat serves as the foundation for your paint scheme, determining the primary color of the car. Start by ensuring the surface is perfectly clean, primed, and sanded. Use a high-quality paint designed for model cars. Apply the base coat in thin, even layers, allowing each layer to dry completely before adding another. This prevents runs and ensures a smooth, consistent finish. Use a consistent spraying technique and maintain a proper distance from the model. If using an airbrush, adjust the air pressure to achieve the best results. For solid colors, apply two or three coats. Once the base coat is dry, inspect the finish for any imperfections and address them with fine-grit sandpaper or touch-up paint. A well-executed base coat will make your custom diecast look professional.
Adding Decals and Details
Adding decals and details is where your custom NASCAR diecast truly comes to life. You can use pre-made decal sheets from hobby stores or create your own custom decals. Carefully cut out each decal and apply it to the model, using tweezers and a hobby knife for precision. Use decal setting solutions to help the decals conform to the contours of the diecast and prevent air bubbles. For detailed elements, such as sponsor logos, driver names, and racing stripes, take your time to ensure accurate placement and alignment. Consider using small paintbrushes for any additional detailing, such as painting headlights, taillights, and other small features. Once all the decals and details are applied, carefully inspect the model to make sure everything is positioned correctly and the decals are adhering properly. This stage requires patience and attention to detail, but it is essential for creating a realistic and eye-catching custom diecast.
Sealing and Finishing Touches

Sealing your custom NASCAR diecast and adding finishing touches protects your work and enhances its appearance. After the decals and details are applied, apply a clear coat to seal the paint and decals, providing a layer of protection and a consistent finish. Choose a clear coat that is compatible with your paint type (acrylic or enamel). Apply the clear coat in thin, even layers, allowing each layer to dry completely before applying the next. This prevents runs and ensures a smooth, professional finish. Once the clear coat is dry, you may choose to add other finishing touches, such as applying a gloss or matte finish, depending on your desired aesthetic. Carefully inspect the model for any imperfections and address them if needed. This final step ensures that your custom diecast will look its best for years to come and protects your investment.
Reassembling Your Diecast
Reassembling your diecast is the final step in the customizing process. Carefully reattach all the parts that were removed during disassembly, such as the wheels, spoilers, mirrors, and interior components. Make sure everything fits together correctly and aligns properly. Use the original screws to secure the body to the chassis, but be careful not to overtighten them. If any parts were damaged during disassembly, you may need to use glue or other adhesives to fix them. Once everything is reassembled, inspect the model for any loose parts or imperfections and address them. Take your time and ensure all the components are securely in place. The final result should be a fully assembled and customized NASCAR diecast that reflects your hard work and creative vision.
Displaying and Caring for Your Custom Diecast
Proper display and care will help preserve your custom NASCAR diecast for years to come. Display your diecast in a location away from direct sunlight, excessive heat, and humidity, as these conditions can damage the paint and decals. Consider using a display case or a protective cover to shield your diecast from dust and accidental damage. When handling your diecast, use clean hands to avoid transferring oils or dirt. Avoid touching the painted surfaces directly. If your diecast needs cleaning, gently dust it with a soft brush or a microfiber cloth. Avoid using harsh chemicals or abrasive cleaners. By following these simple guidelines, you can ensure that your custom diecast remains in excellent condition and continues to provide enjoyment for years to come.
Protecting Your Investment

Protecting your investment in custom NASCAR diecasts involves taking several precautions to maintain their value and condition. First, ensure your workspace is clean and well-lit to prevent accidental damage during the customizing process. Use high-quality materials and tools to achieve the best possible results. Apply protective clear coats to seal the paint and decals. Display your diecasts in a safe place, away from direct sunlight and extreme temperatures. When handling your diecasts, do so with clean hands to prevent any damage. If you plan to sell your custom diecasts, document the process with photos and keep records of all materials used. Consider storing your diecasts in individual cases or protective packaging to prevent scratches and dust accumulation. Proper storage, careful handling, and regular maintenance will contribute to preserving the value and extending the lifespan of your custom diecast collection.
Where to Find Resources and Inspiration
Finding resources and inspiration is crucial for any custom NASCAR diecast project. Start by exploring online communities and forums dedicated to diecast collecting and customizing. These platforms offer a wealth of information, including tutorials, tips, and advice from experienced modelers. Websites, such as YouTube, offer a plethora of video tutorials demonstrating various customizing techniques, from basic painting to advanced detailing. Browse through online galleries and social media pages to see the work of other customizers and get ideas for your own projects. Consider joining a local model car club or attending model car shows, where you can connect with fellow enthusiasts and learn from their experience. Additionally, research real NASCAR paint schemes, historical racing cars, and unique designs for inspiration. Embrace the process of learning and experimentation, and don’t be afraid to try new techniques. The more resources you explore, the more confident and creative you’ll become in your custom diecast journey.
Online Communities and Forums
Online communities and forums are invaluable resources for custom NASCAR diecast enthusiasts. These platforms offer a space to connect with fellow hobbyists, share your work, seek advice, and learn from others. Forums dedicated to model cars, diecast collecting, and NASCAR often have sections specifically for customization. These sections feature discussions on various techniques, paint types, decal applications, and recommended tools. You can find answers to your questions, troubleshoot issues, and gain inspiration from the diverse projects showcased by other members. Social media platforms like Facebook and Instagram also host numerous groups and pages dedicated to custom diecasts, where you can share photos of your work and interact with other modelers. Participating in these communities not only improves your customizing skills but also fosters a sense of camaraderie and support.
Common Customizing Mistakes to Avoid

Avoiding common customizing mistakes is crucial for achieving professional-looking results. One of the most frequent errors is neglecting surface preparation; always ensure the surface is clean, primed, and smooth before painting. Rushing the painting process can lead to runs, drips, and an uneven finish. Always apply thin, even coats and allow each coat to dry completely. Using the wrong type of paint or incompatible materials is another common mistake. Research the correct paints and thinners for your project. Failing to protect your work with a clear coat can leave the paint and decals vulnerable to damage. Finally, avoid cutting corners or skipping steps. Patience and attention to detail are key to creating high-quality custom NASCAR diecasts. Learning from your mistakes and continually improving your techniques will enhance your skills and the overall appearance of your custom creations.